
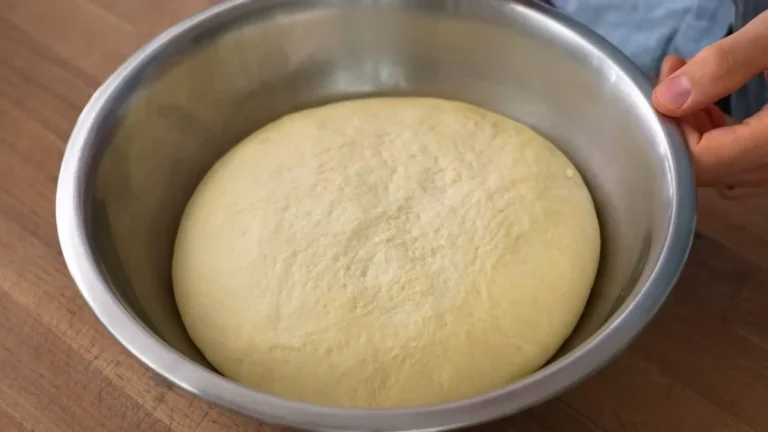

If you have ever bitten into a slice of authentic Chicago deep dish pizza and marveled at that thick, buttery, cracker-crisp crust, you already know it is nothing like regular pizza dough.
This Chicago Deep Dish Pizza Dough recipe uses a precise, low-gluten technique -cold butter pulsed into flour in a food processor, minimal mixing, and a long cold fermentation -to produce a crust that is tender and flaky like a pie crust, yet sturdy enough to hold layers of cheese, meat, and chunky tomato sauce without going soggy.
Whether you are a deep dish devotee or trying it for the very first time, this dough recipe is your foundation for the perfect homemade Chicago-style pizza. Let’s get into it.
What Does Chicago Deep Dish Pizza Dough Taste Like?
This dough delivers a flavor and texture that is genuinely unlike any other pizza crust you have made. The cold butter folded into the flour gives it a rich, slightly nutty, almost pastry-like taste -warm, indulgent, and deeply satisfying without being greasy.

The long cold fermentation (12 to 24 hours) develops a gentle yeasty complexity and a subtle tang that you simply cannot achieve with a quick-rise dough.
The texture is where this recipe truly shines: the exterior bakes up golden and shatteringly crisp, while the interior remains tender and slightly crumbly -closer to a buttery pie crust than a chewy bread base. Every bite of filling is anchored by a crust that holds its structure without ever feeling dense or doughy.
Ingredients & Kitchen Equipment
Ingredients
- All-purpose flour -375 g
- Salt -10 g
- Cold unsalted butter -40 g, cubed
- Water -220 g, warmed to 90°F
- Instant yeast -6 g
- Olive oil -for greasing the pan
- All-purpose flour -extra, for dusting the work surface
Kitchen Equipment
- Food processor (essential for low-gluten mixing)
- Rolling pin
- 12-inch deep dish pan (Lloyd brand preferred) or 12-inch seasoned cast iron pan
- Large mixing bowl
- Kitchen scale (for gram-accurate measurements)
- Instant-read or probe thermometer (to check water temperature)
- Plastic wrap or bowl cover
- Paper towels (for spreading olive oil in the pan)
- Wire cooling rack (for resting the finished pizza before slicing)
Preparation Time, Fermentation Time & Yield
- Active Prep Time: 20 minutes
- Room Temperature Ferment: 30 minutes
- Cold Ferment (Refrigerator): 12–24 hours (minimum 12, ideal 24)
- Warm-Up Before Rolling: 45 minutes
- Total Hands-Off Time: 13–25 hours
- Yield: 1 x 12-inch deep dish pizza crust
- Difficulty: Intermediate
How to Make Chicago Deep Dish Pizza Dough – Step by Step
Step 1 -Pulse the Butter into the Flour
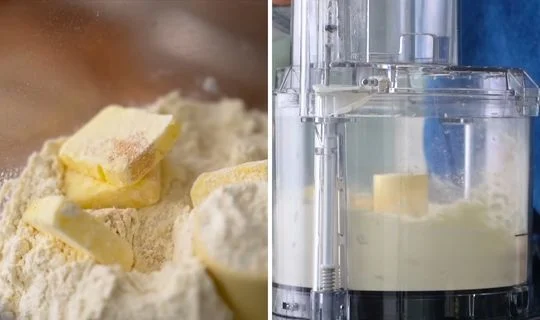
Add the all-purpose flour, salt, and cold cubed butter to the bowl of a food processor. Pulse for about 15 seconds until the butter is cut into the flour and the mixture resembles coarse, sandy crumbs. The butter should be in small, irregular pieces throughout – not fully blended in. This is exactly what creates the flaky, pie-crust-like texture that defines an authentic Chicago deep dish crust.
Keep your butter cold right up until the moment it goes into the food processor. Cold butter creates steam pockets during baking that produce flakiness. Warm or softened butter will blend too fully into the flour and result in a tougher, greasier crust.
Step 2 -Dissolve the Yeast in Warm Water
In a separate container or measuring cup, stir together the 220 g of water (warmed to 90°F) and the instant yeast. Stir until the yeast is fully dissolved. Use an instant-read thermometer to verify your water temperature -water that is too hot (above 110°F) will kill the yeast, and water that is too cold will slow the fermentation significantly.
Step 3 -Mix the Dough in the Food Processor
With the food processor running on low, slowly stream the yeast-water mixture into the flour-butter mixture. Process for about 1 minute, just until everything comes together into a shaggy dough. The target texture should fall somewhere between a bread dough and a pie crust -it will look a little rough and that is perfectly fine.
Do not over-process. The entire purpose of using a food processor instead of a stand mixer is to keep gluten development as low as possible, which is what gives this crust its signature tender, crumbly bite rather than a chewy, bready texture.
Step 4 -Shape into a Ball and Build Light Surface Tension
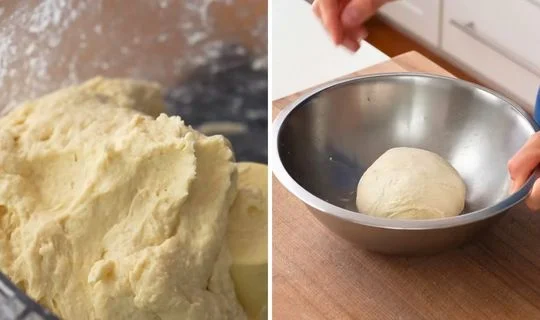
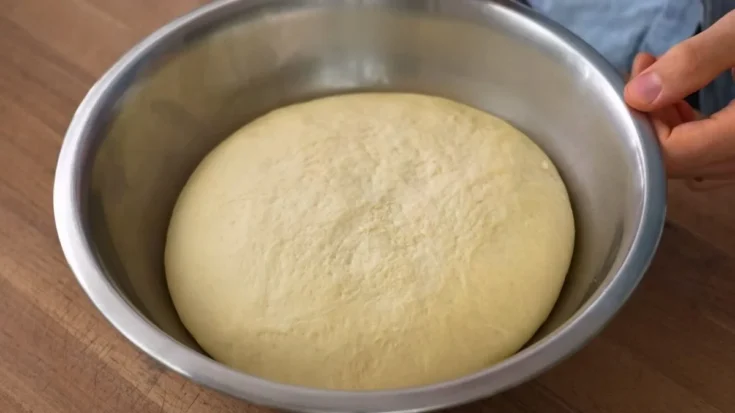
Turn the dough out onto a clean surface and gently shape it into a smooth ball by pulling the surface taut with your hands. This is the one and only strength-building step for this dough -you are not kneading, just creating enough surface tension to hold the dough together neatly. Place it into a clean bowl.
Step 5 -Room Temperature Ferment for 30 Minutes
Cover the bowl with plastic wrap or a lid and let the dough ferment at room temperature for 30 minutes. This initial rest gives the yeast a head start before the slow cold fermentation begins.
Step 6 -Cold Ferment in the Refrigerator for 12–24 Hours
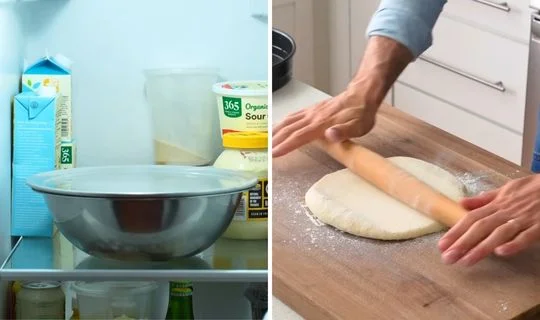
After the room temperature rest, transfer the covered bowl to the refrigerator and cold-ferment the dough for a minimum of 12 hours, ideally 24 hours. Do not rush this step. The long, slow cold fermentation is what develops deep flavor, creates a more digestible dough, and -most importantly for this recipe -produces a noticeably crispier, crunchier finished crust. The longer it ferments, the better it gets.
Step 7 -Bring the Dough to Room Temperature Before Rolling
When you are ready to build your pizza, remove the dough from the refrigerator and let it sit at room temperature for 45 minutes. This step is essential -the butter inside the dough needs to soften slightly before rolling, or the dough will tear and crack. After 45 minutes, the dough should feel pliable, smooth, and easy to work with.
Step 8 -Roll the Dough to 14 Inches
Flour your work surface generously and place the dough on top. Flour the top of the dough as well. Pat it gently to degas any large air bubbles, then flip it over. Using a rolling pin, roll the dough out to approximately 14 inches in diameter.
Because the gluten development is so low, the dough should roll out easily with almost no springback. If you hit small sticky butter spots, simply dust with a little flour and continue rolling. Do not hand-press or stretch this dough like focaccia -rolling is the correct method here and it prevents overworking the dough.
Step 9 -Line the Deep Dish Pan
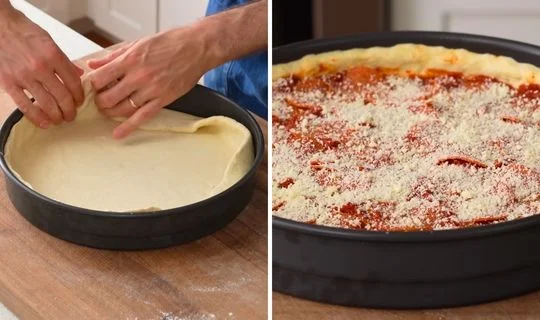
Generously grease the 12-inch deep dish pan with olive oil and spread it evenly across the bottom and up the sides using a paper towel. Carefully drape the rolled dough into the pan.
Then, using your fingertips, press and pinch the dough up the sides of the pan, making absolutely sure to push the dough fully into the bottom corner where the base meets the wall. Any gap between the crust and the pan will trap steam during baking and soften the crust -your arch-enemy in deep dish pizza making.
After pressing the dough into the pan, let it rest for another 10–15 minutes before adding toppings. This relaxes the gluten just enough to prevent the crust from shrinking back during baking.
Customization & Topping Ideas for Chicago Deep Dish Pizza
1. Go Classic with the Traditional Chicago Layer Order
Build your Chicago Deep Dish Dough Recipe into a hearty Italian-inspired meal by serving it with our carmelas chicken rigatoni recipe and olive garden caesar salad recipe for a satisfying combination of rich pasta, crisp salad, and cheesy deep-dish pizza
2. Use Italian Sausage as Your Protein Foundation
The most iconic Chicago deep dish filling is a generous layer of raw, uncooked Italian sausage pressed flat directly onto the cheese. As the pizza bakes, the sausage fat renders into the crust, creating an unbelievably savory, juicy layer. Use fennel-forward Italian pork sausage for the most authentic Chicago flavor profile.
3. Add Roasted Garlic for Aromatic Depth
Spread a thin layer of slow-roasted garlic paste directly onto the raw dough before laying down the cheese. The roasted garlic melts into the bottom crust as the pizza bakes, infusing it with a deep, sweet, nutty garlic flavor that elevates every layer above it.
4. Make a Vegetarian Deep Dish with Chunky Vegetables
This crust holds up beautifully to heavy vegetable fillings. Layer roasted red peppers, sautéed mushrooms, caramelized onions, spinach, and black olives over the cheese for a hearty, meat-free Chicago deep dish that is every bit as satisfying as the original.
5. Try a White Deep Dish Pizza with Ricotta and Spinach
Skip the tomato sauce entirely and build a white Chicago deep dish instead. Layer fresh ricotta, shredded mozzarella, sautéed spinach, and a light drizzle of olive oil. Finish with a dusting of freshly grated parmesan and cracked black pepper on top. The buttery crust pairs beautifully with the creamy, herb-flecked white filling.
6. Add a Cornmeal Dusting for Extra Crunch
For an even crispier bottom crust, dust the greased pan with a thin, even layer of fine yellow cornmeal before laying in the dough. The cornmeal creates a textured, slightly gritty outer crust that is closer to what you’ll find at legendary Chicago pizzerias like Lou Malnati’s and Giordano’s.

7. Rest on a Wire Rack Before Slicing
This is less a topping idea and more an essential finishing technique. Once your Chicago deep dish comes out of the oven, resist the urge to slice it immediately. Let it rest on a wire rack for 10–15 minutes. This allows steam to escape from the bottom of the crust without it sitting in condensation, which keeps the bottom crust crisp and structurally sound when you cut into it.
Pro Tips for Perfect Chicago Deep Dish Pizza Dough
1. Use a Kitchen Scale, Not Volume Measurements
This dough recipe is written in grams for good reason. Flour in particular is notoriously inaccurate when measured by cup -a “cup” of flour can vary by as much as 30% depending on how it is scooped. A kitchen scale ensures precise, consistent results every single time and is especially important for bread and pizza dough where hydration ratios are critical.
2. Never Skip the Cold Fermentation
The 12–24 hour cold ferment is not optional -it is the most important step in this entire recipe. Cold fermentation slows yeast activity to a near-crawl, allowing enzymes in the flour to break down starches and proteins over time. The result is dramatically improved flavor complexity, better browning, a more open crumb structure, and most importantly for deep dish -a noticeably crispier, crunchier crust. Plan ahead and make the dough the day before you want to bake.
3. Do Not Over-Process the Dough
The food processor should run for just about 1 minute after you add the yeast water. Stop as soon as the dough comes together. Every extra second of processing develops more gluten, which makes the crust chewier and tougher rather than flaky and tender. When in doubt, under-mix rather than over-mix. A slightly shaggy, rough-looking dough is exactly what you want coming out of the food processor.
4. Check Your Water Temperature Precisely
Yeast is temperature-sensitive. Water at 90°F activates instant yeast at the correct rate for this recipe’s long cold fermentation schedule. Water below 80°F will slow activation too dramatically; water above 110°F will begin killing the yeast cells, resulting in a dough that won’t rise properly. Use an instant-read thermometer -guessing the temperature by feel is not accurate enough for reliable results.
5. Let the Dough Warm Up Fully Before Rolling
The 45-minute room temperature rest after removing the dough from the refrigerator is non-negotiable. Cold dough = cold, hard butter = a dough that cracks and tears when you roll it. Properly tempered dough rolls smoothly to 14 inches with barely any effort and virtually zero springback. If the dough is still fighting back and snapping, give it another 10–15 minutes at room temperature and try again.
6. Grease the Pan Generously with Olive Oil
Chicago deep dish is not a delicate, lightly oiled situation. You want a generous, even coating of olive oil on the bottom and sides of the pan before the dough goes in. The olive oil is essential for two reasons: it prevents sticking, and -more importantly -it fries the bottom of the crust during baking, producing that distinctive golden-brown, slightly crispy exterior that is the hallmark of an authentic deep dish crust.
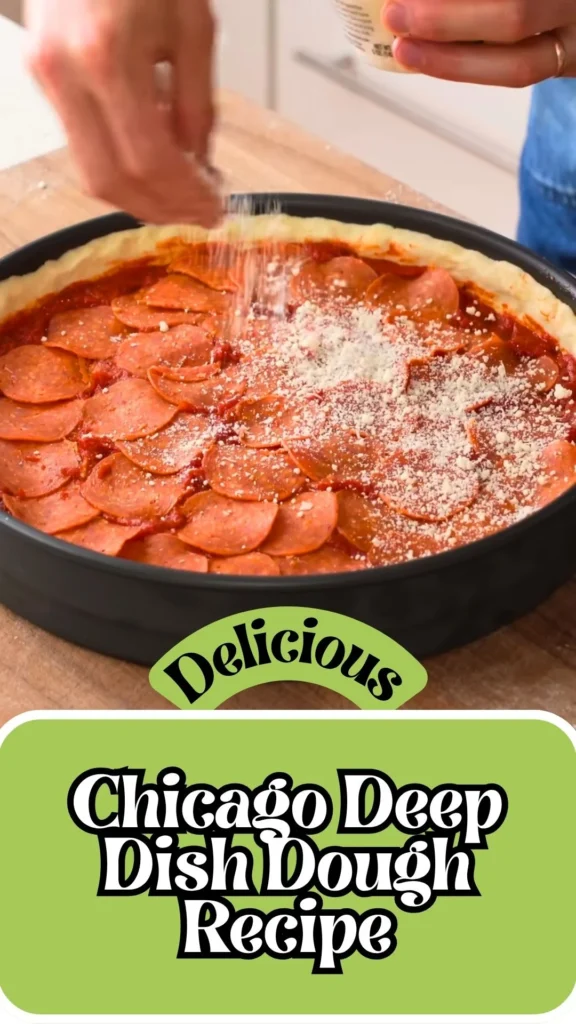
7. Press the Dough Tightly into the Bottom Corner
When lining the pan, take an extra minute to press the dough firmly into the sharp corner where the bottom meets the side wall. Any gap or air pocket in that corner will trap steam during baking, creating a soft, steamed bubble in the crust rather than a crisp, baked one. Use your fingertips to work the dough methodically around the entire circumference of the pan until there is no daylight between the dough and the pan.
Storage & Reheating Guidance
- Refrigerator (raw dough): Keeps well in the refrigerator for up to 3 days after the cold ferment. The dough will continue developing flavor the longer it sits.
- Freezer (raw dough): Freeze the shaped dough ball (after the room temperature ferment) in a well-sealed bag for up to 3 months. Thaw overnight in the refrigerator, then allow the full 45-minute room temperature rest before rolling.
- Baked crust / finished pizza: Store leftover baked deep dish pizza in an airtight container in the refrigerator for up to 3 days. Reheat individual slices in a 375°F oven for 10–12 minutes to restore crust crispness. Avoid the microwave -it makes the crust soggy.
Frequently Asked Questions About Chicago Deep Dish Pizza Dough
Here, we’ve got you covered with some common questions that people often ask.
Why does Chicago deep dish dough use butter instead of olive oil?
Butter is what gives Chicago deep dish its distinctive flaky, pie-crust-like texture that sets it apart from all other pizza styles. The fat in butter coats the flour proteins and physically interrupts gluten strand formation, keeping the dough tender and crumbly rather than stretchy and chewy. Olive oil, by contrast, produces a softer, more pliable dough. This recipe uses a reduced amount of butter (about half of many traditional versions) to maximize crispness without making the crust overly rich or greasy.
Can I make Chicago deep dish dough without a food processor?
Yes, but with caution. The food processor is recommended specifically because its high-speed, brief mixing keeps gluten development minimal. If using a stand mixer, use the paddle attachment (not the dough hook) on the lowest speed and mix for no longer than 1–2 minutes after adding the water. Mixing by hand is also possible – cut the butter into the flour using a pastry cutter or your fingertips (work quickly to keep the butter cold), then fold in the yeast water until just combined.
Can I use bread flour instead of all-purpose flour?
This is not recommended for this recipe. Bread flour has a significantly higher protein content (12–14%) compared to all-purpose flour (10–12%), which means it develops much more gluten during mixing. More gluten = a chewier, tougher, more elastic crust -the opposite of what Chicago deep dish dough should be. Stick with all-purpose flour for the correct flaky, tender texture. Some recipes call for a blend of all-purpose and semolina for extra crunch, which is a viable variation.
How long can I cold ferment the dough in the refrigerator?
The minimum cold ferment time is 12 hours, and the ideal is 24 hours. You can push it to 48–72 hours for an even more complex, tangy flavor and an increasingly crispy crust, as the extended enzymatic activity continues to break down starches. Beyond 72 hours, the yeast activity may begin to over-ferment the dough, producing an overly sour flavor and a weaker gluten structure that tears during rolling.
Why is my deep dish crust soft instead of crispy on the bottom?
There are three common culprits: not enough olive oil in the pan (the bottom needs to fry, not just bake), too short a cold fermentation (less flavor development and less structural crispness), or slicing the pizza directly out of the oven without resting it on a wire rack first. Letting the baked pizza rest on a wire rack for 10–15 minutes allows steam to escape from beneath the crust, preventing it from steaming itself into sogginess inside the pan.
What is the difference between Chicago deep dish and Detroit-style pizza dough?
Both are thick-crust, pan-baked pizza styles, but their doughs are fundamentally different. Chicago deep dish dough is lower in hydration and fat, mixed minimally to limit gluten, and produces a flaky, pie-crust-like texture. Detroit-style pizza dough is higher in hydration, uses olive oil rather than butter, and is mixed more thoroughly to develop an airy, focaccia-like interior with a lacey, crispy cheese-crusted edge. Detroit pizza is also baked in a rectangular seasoned steel pan rather than a round deep dish pan.
Can I make the dough ahead and freeze it?
Yes. After completing the 30-minute room temperature ferment (Step 5), shape the dough into a ball, wrap it tightly in plastic wrap, place it in a freezer-safe bag, and freeze for up to 3 months. When ready to use, transfer it to the refrigerator to thaw overnight, then allow the 45-minute room temperature rest before rolling. The cold thaw acts as your cold fermentation period, so the dough will still develop good flavor and crispness.
Do I need a special deep dish pan for this recipe?
A 12-inch deep dish pan is strongly recommended -specifically a Lloyd pan if you can find one, as its anodized aluminum construction distributes heat exceptionally evenly for a uniformly crispy crust. A 12-inch well-seasoned cast iron skillet is an excellent home alternative that also produces fantastic results. Avoid glass baking dishes or thin, flimsy cake pans, as they do not conduct or retain heat well enough to properly crisp the bottom of a deep dish crust.
Chicago Deep Dish Dough Recipe
If you have ever bitten into a slice of authentic Chicago deep dish pizza and marveled at that thick, buttery, cracker-crisp crust, you already know it is nothing like regular pizza dough.
Ingredients
- All-purpose flour -375 g
- Salt -10 g
- Cold unsalted butter -40 g, cubed
- Water -220 g, warmed to 90°F
- Instant yeast -6 g
- Olive oil -for greasing the pan
- All-purpose flour -extra, for dusting the work surface
Instructions
Step 1 -Pulse the Butter into the Flour
Add the all-purpose flour, salt, and cold cubed butter to the bowl of a food processor. Pulse for about 15 seconds until the butter is cut into the flour and the mixture resembles coarse, sandy crumbs. The butter should be in small, irregular pieces throughout – not fully blended in. This is exactly what creates the flaky, pie-crust-like texture that defines an authentic Chicago deep dish crust.
Keep your butter cold right up until the moment it goes into the food processor. Cold butter creates steam pockets during baking that produce flakiness. Warm or softened butter will blend too fully into the flour and result in a tougher, greasier crust.
Step 2 -Dissolve the Yeast in Warm Water
In a separate container or measuring cup, stir together the 220 g of water (warmed to 90°F) and the instant yeast. Stir until the yeast is fully dissolved. Use an instant-read thermometer to verify your water temperature -water that is too hot (above 110°F) will kill the yeast, and water that is too cold will slow the fermentation significantly.
Step 3 -Mix the Dough in the Food Processor
With the food processor running on low, slowly stream the yeast-water mixture into the flour-butter mixture. Process for about 1 minute, just until everything comes together into a shaggy dough. The target texture should fall somewhere between a bread dough and a pie crust -it will look a little rough and that is perfectly fine. Do not over-process. The entire purpose of using a food processor instead of a stand mixer is to keep gluten development as low as possible, which is what gives this crust its signature tender, crumbly bite rather than a chewy, bready texture.
Step 4 -Shape into a Ball and Build Light Surface Tension
Turn the dough out onto a clean surface and gently shape it into a smooth ball by pulling the surface taut with your hands. This is the one and only strength-building step for this dough -you are not kneading, just creating enough surface tension to hold the dough together neatly. Place it into a clean bowl.
Step 5 -Room Temperature Ferment for 30 Minutes
Cover the bowl with plastic wrap or a lid and let the dough ferment at room temperature for 30 minutes. This initial rest gives the yeast a head start before the slow cold fermentation begins.
Step 6 -Cold Ferment in the Refrigerator for 12–24 Hours
After the room temperature rest, transfer the covered bowl to the refrigerator and cold-ferment the dough for a minimum of 12 hours, ideally 24 hours. Do not rush this step. The long, slow cold fermentation is what develops deep flavor, creates a more digestible dough, and -most importantly for this recipe -produces a noticeably crispier, crunchier finished crust. The longer it ferments, the better it gets.
Step 7 -Bring the Dough to Room Temperature Before Rolling
When you are ready to build your pizza, remove the dough from the refrigerator and let it sit at room temperature for 45 minutes. This step is essential -the butter inside the dough needs to soften slightly before rolling, or the dough will tear and crack. After 45 minutes, the dough should feel pliable, smooth, and easy to work with.
Step 8 -Roll the Dough to 14 Inches
Flour your work surface generously and place the dough on top. Flour the top of the dough as well. Pat it gently to degas any large air bubbles, then flip it over. Using a rolling pin, roll the dough out to approximately 14 inches in diameter. Because the gluten development is so low, the dough should roll out easily with almost no springback. If you hit small sticky butter spots, simply dust with a little flour and continue rolling. Do not hand-press or stretch this dough like focaccia -rolling is the correct method here and it prevents overworking the dough.
Step 9 -Line the Deep Dish Pan
Generously grease the 12-inch deep dish pan with olive oil and spread it evenly across the bottom and up the sides using a paper towel. Carefully drape the rolled dough into the pan. Then, using your fingertips, press and pinch the dough up the sides of the pan, making absolutely sure to push the dough fully into the bottom corner where the base meets the wall. Any gap between the crust and the pan will trap steam during baking and soften the crust -your arch-enemy in deep dish pizza making.
After pressing the dough into the pan, let it rest for another 10–15 minutes before adding toppings. This relaxes the gluten just enough to prevent the crust from shrinking back during baking.
Notes
- Refrigerator (raw dough): Keeps well in the refrigerator for up to 3 days after the cold ferment. The dough will continue developing flavor the longer it sits.
- Freezer (raw dough): Freeze the shaped dough ball (after the room temperature ferment) in a well-sealed bag for up to 3 months. Thaw overnight in the refrigerator, then allow the full 45-minute room temperature rest before rolling.
- Baked crust / finished pizza: Store leftover baked deep dish pizza in an airtight container in the refrigerator for up to 3 days. Reheat individual slices in a 375°F oven for 10–12 minutes to restore crust crispness. Avoid the microwave -it makes the crust soggy.
Nutrition Information:
Yield:
8Serving Size:
1Amount Per Serving: Calories: 562
We’d love to know how this recipe works out for you! Give it a try and leave a comment below to share your experience, tips, or any tweaks you made. Don’t forget to follow us on Pinterest and YouTube for more tasty recipes and kitchen inspiration. Your support and feedback truly mean everything to us!