
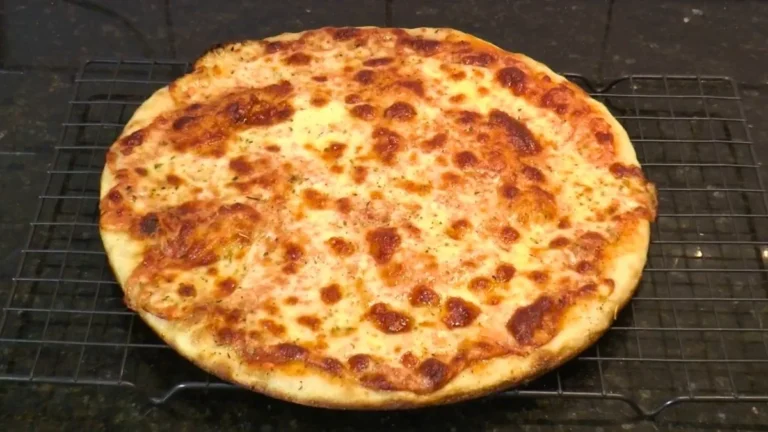

If you have ever wondered what makes Little Caesars pizza crust so uniquely thick, chewy, and golden on the bottom, the secret is a long, slow cold fermentation process that most homemade pizza recipes skip entirely.
This Little Caesars pizza crust copycat recipe recreates that signature deep-dish style crust from scratch -crispy and caramelized on the outside, airy and tender on the inside -using a high-hydration dough, a bright San Marzano tomato sauce, and a restaurant-style mozzarella-muenster cheese blend.
Yes, it takes two days, but the active work is minimal. Plan ahead, follow these steps, and you will bake the closest thing to Little Caesars pizza you have ever made at home.
What Does Little Caesars Pizza Crust Taste Like?
The hallmark of a Little Caesars-style pizza crust is its distinct contrast of textures and flavors. The bottom crust is deeply golden and slightly crispy from direct contact with the oiled pan at high heat, while the interior stays soft, pillowy, and just a little chewy from the long cold ferment.

The dough itself has a mild, yeasty sweetness -enhanced subtly by sugar and optional malt powder -that pairs beautifully with the tangy, herb-bright San Marzano tomato sauce.
The mozzarella-muenster cheese blend melts into a creamy, stretchy, slightly buttery layer that finishes every bite with rich, savory depth.
Ingredients & Kitchen Equipment
Dough Ingredients
- Water: 357 g (cool or lukewarm)
- Yeast: 6 g (about 2 tsp)
- Bread flour: 525 g (approx. 3½ cups)
- Sugar: 12 g (approx. 1 tbsp)
- Malt powder: 10 g / 1 tbsp (optional, for extra crust browning)
- Sea salt or kosher salt: 12 g (2 tsp)
- Extra virgin olive oil: 26 g (2 tbsp)
Pizza Sauce Ingredients
- San Marzano canned tomatoes: 1 can (28 oz)
- Black pepper: 1 tsp
- Sea salt or kosher salt: 1 tsp
- Extra virgin olive oil: 2 tbsp
- Garlic: 4 cloves, chopped
- Fresh basil leaves: 4 large, cut up
Cheese Blend Ingredients
- Low-moisture whole milk mozzarella: 2/3 of total cheese (such as Galbani)
- Muenster cheese: 1/3 of total cheese (black muenster from the deli counter)
Assembly
- Regular neutral oil (for greasing the pan)
- Dried oregano (for finishing)
Sizing Guide
- 12-inch pizza / 12.5-inch pan: Use an 11.8 oz (312 g) dough ball
- 14-inch pan: Use 16.4 oz (465 g) dough ball
Kitchen Utensils
- Large mixing bowl or pot
- Kitchen scale (essential for accurate dough measurements)
- Large wooden spoon or dough scraper
- Plastic wrap or airtight lid
- Airtight Tupperware containers (for cold ferment dough balls)
- Blender or food processor (for sauce)
- 12-inch or 14-inch pizza pan (round, not perforated)
- Baking stone (optional, for crispier bottom)
- Bench scraper or chef’s knife (for portioning dough)
- Tongs and pizza wheel or sharp knife for serving
Preparation Time, Cooking Time & Servings
- Dough Prep Time: 20 minutes active work
- Cold Ferment Time: 2 days (48 hours in the refrigerator)
- Same-Day Rise Time: 4 hours (3 hours to reach room temp + 1 hour pan proof)
- Sauce Prep Time: 10 minutes
- Assembly Time: 10 minutes
- Bake Time: 12–13 minutes
- Servings: 2–3 pizzas (depending on pan size)
- Difficulty: Intermediate (mostly hands-off waiting time)
How to Make Little Caesars Pizza Crust from Scratch
Part 1: Make the Pizza Dough (68% Hydration)
Important: The dough must cold-ferment in the refrigerator for 2 full days before baking. Plan accordingly.
Step 1 -Mix the Wet Ingredients
Add 357 g of cool or lukewarm water to a large bowl or pot. Add 6 g of yeast, 12 g of sugar, and 26 g of extra virgin olive oil. Stir gently to combine and allow the yeast to begin dissolving in the water.
Step 2 -Add the Dry Ingredients
Add 525 g of bread flour, 10 g of malt powder (if using), and 12 g of sea salt or kosher salt to the wet mixture. Stir with a large spoon until all the flour is incorporated and the dough begins to come together into a shaggy mass.
Adding malt powder is optional but highly recommended if you want that deep golden-brown crust color that is characteristic of Little Caesars pizza. Diastatic malt powder works best.
Step 3 -Knead the Dough
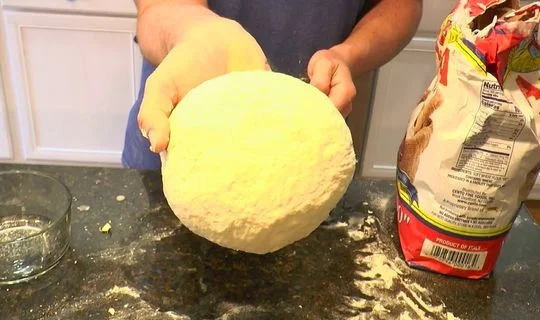
Turn the dough out onto a clean counter or continue in the bowl. Knead by pressing, folding, and rotating the dough for 5 to 10 minutes until it forms a smooth, cohesive ball. The dough should feel slightly tacky but not sticky. At 68% hydration this is a wetter dough than standard pizza dough -this is what creates that open, airy crumb structure.
Step 4 -First Rise (Room Temperature)
Return the dough ball to the pot or bowl. Cover tightly with a lid or plastic wrap. Let it sit at room temperature for 1 to 2 hours until the dough has doubled in size.
Step 5 -Cold Ferment (2 Days)
Punch the dough down lightly, cover, and place the entire pot in the refrigerator. Cold-ferment for 2 full days. During this time, the yeast works slowly, developing deep flavor, improved gluten structure, and that characteristic chew that sets this crust apart from fast-risen pizza dough.
Step 6 -Portion the Dough
After 2 days, remove the dough from the refrigerator. Using a kitchen scale, portion it into dough balls:
- 312 g (11.8 oz) for a 12-inch pizza
- 465 g (16.4 oz) for a 14-inch pizza
Place each dough ball into a lightly oiled Tupperware container or covered bowl. Seal and refrigerate any dough balls you are not using that day.
Step 7 – Final Room Temperature Rise
Remove the dough balls from the fridge 4 hours before you plan to bake. Allow 3 hours for the dough to come fully to room temperature, then proceed to shaping and the 1-hour pan proof in Step 10.
Part 2: Make the Pizza Sauce
Step 8 -Blend the Sauce
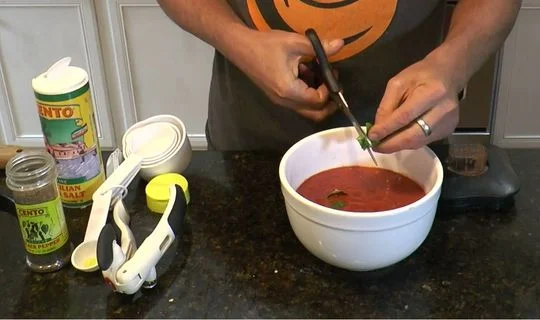
Add the entire can of San Marzano tomatoes, 1 tsp black pepper, 1 tsp salt, 2 tbsp extra virgin olive oil, and 4 chopped garlic cloves into a blender. Pulse several times until the tomatoes and garlic are crushed and the sauce is smooth but not completely liquefied -a slight texture is ideal.
Step 9 -Add Fresh Basil
Transfer the blended sauce to a bowl. Stir in the 4 cut fresh basil leaves. The sauce is ready to use immediately, but for the best flavor, cover and refrigerate overnight. The garlic and basil will bloom and mellow, producing a richer, more cohesive sauce.
Part 3: Assemble & Bake the Pizza
Step 10 -Prep the Pan and Shape the Dough
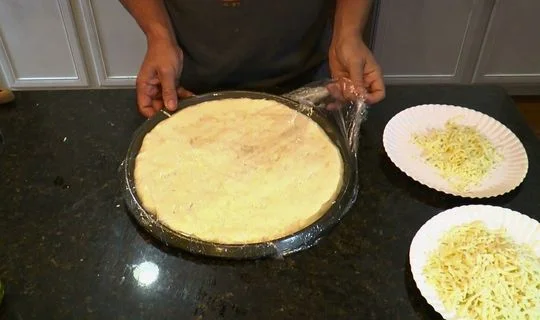
Lightly coat your pizza pan with a neutral oil (not extra virgin olive oil, as it burns at the high temperatures needed). Using the flat parts of your fingers, press the room-temperature dough ball out in a circular motion until it is slightly larger than the pan. Lay it gently into the oiled pan, pressing it to fill the edges.
Important: Use regular vegetable or canola oil for the pan -not EVOO. Extra virgin olive oil has a lower smoke point and will burn at 500°F, giving the bottom crust a bitter, acrid flavor.
Step 11 -Pan Proof (1 Hour)
Cover the pan loosely with plastic wrap. Allow the shaped dough to rise at room temperature for 1 hour. It should puff noticeably and look pillowy before you dress it.
Step 12 – Dress the Pizza
Spread a medium, even layer of the tomato sauce over the dough, leaving approximately half an inch bare around the perimeter for the crust edge. Top generously and evenly with 2/3 of the shredded low-moisture whole milk mozzarella. Layer the remaining 1/3 muenster cheese on top of the mozzarella. Finish with a light sprinkle of dried oregano.
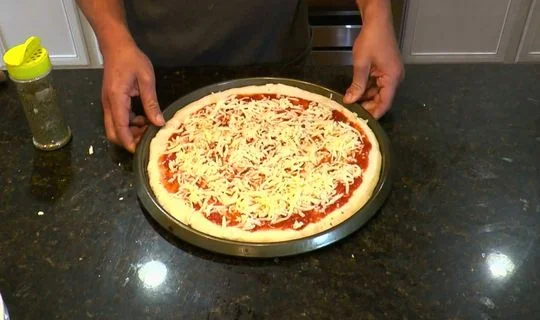
Cheese Tip: Never use pre-shredded cheese for this recipe. The cellulose coating on bagged shredded cheese prevents proper melting and can cause scorching in a 500°F oven. Shred your own mozzarella and slice or shred your muenster fresh from the block or deli counter.
Step 13 -Bake at 500°F
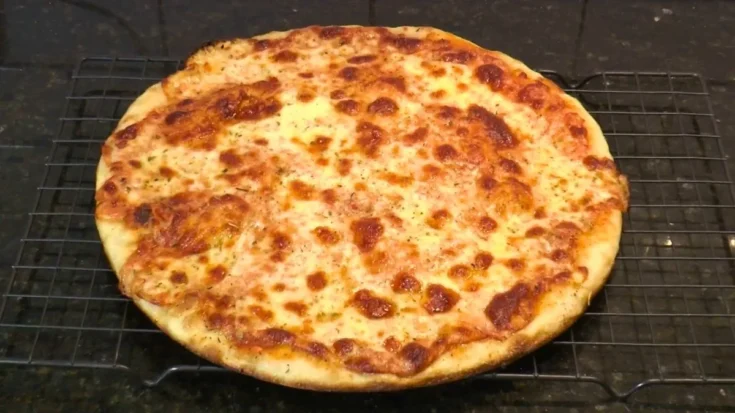
Preheat your oven to 500°F (260°C). Place the pizza pan on the bottom rack of the oven, or set it directly on a preheated baking stone for the crispiest possible bottom crust. Bake for 12 to 13 minutes until the crust is deep golden brown on the sides and the bottom is visibly browned and caramelized when you lift an edge with a spatula. The cheese should be fully melted, bubbly, and just beginning to spot with golden color.
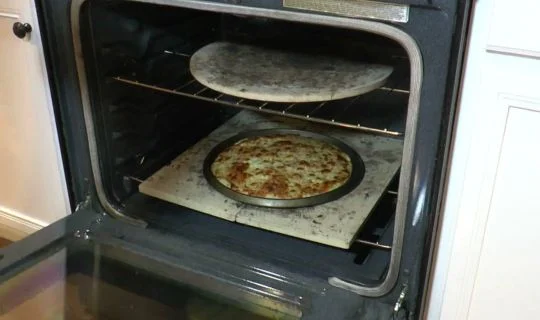
Step 14 -Rest, Slice & Serve
Remove the pizza from the oven and let it rest in the pan for 2–3 minutes before slicing. This brief rest allows the cheese to set slightly and makes for cleaner cuts. Slice into 8 pieces and serve immediately.
Customization & Serving Ideas for Little Caesars Copycat Pizza
1. Go Classic Pepperoni for the Full Little Caesars Experience
Top your pizza with generous overlapping slices of cup-and-char pepperoni (not flat-style) before baking. The cupped edges collect rendered fat and caramelize at the high baking temperature, creating crispy, slightly charred pepperoni bites that are unmistakably reminiscent of the Little Caesars original. Hormel Rosa Grande is the closest widely available deli option.
2. Add Italian Sausage and Bell Peppers for a Hearty Topping
Crumble raw Italian sausage over the cheese layer along with thinly sliced green and red bell peppers before baking. The sausage fat renders directly into the cheese as the pizza bakes, adding a savory, fennel-spiced richness that turns this simple copycat into a fully loaded family pizza night centerpiece.
3. Build a White Garlic Pizza Variation
Skip the San Marzano tomato sauce entirely and replace it with a simple white garlic butter sauce -melted butter, minced garlic, a pinch of salt, and dried Italian herbs. Top with the mozzarella-muenster blend plus a handful of baby spinach and sliced mushrooms for a completely different but equally delicious Little Caesars-style pizza experience.
4. Finish with Hot Honey and Chili Flakes
Drizzle the finished, baked pizza with hot honey (or a combination of regular honey and red chili flakes) the moment it comes out of the oven. The sweet heat plays beautifully against the salty, savory cheese and tangy tomato sauce, creating a sweet and spicy contrast that has become one of the most popular pizza finishing trends right now.
5. Add Fresh Basil and a Drizzle of Olive Oil After Baking
Once the pizza is out of the oven and resting, scatter a handful of fresh basil leaves over the top and drizzle lightly with high-quality extra virgin olive oil. The residual heat wilts the basil just enough without cooking it, preserving its bright, aromatic flavor and giving the pizza a fresh, elevated finish reminiscent of a Neapolitan-style pie.
6. Make Individual Personal Pan Pizzas
Portion the dough into smaller 180–200 g balls and press them into 6-inch oiled cake pans or cast iron skillets for personal pan pizzas. This is a great option for family dinners where everyone can customize their own toppings, and the smaller format bakes in just 10–11 minutes instead of the full 12–13.

7. Pair with Fresh Sides
Complete your Little Caesars Pizza Crust Recipe with our olive garden caesar salad recipe and olive garden italian salad dressing for a restaurant-style pizza night featuring crisp greens, bold flavors, and a delicious homemade touch.
Pro Tips for the Perfect Little Caesars Copycat Pizza Crust
1. Use a Kitchen Scale -Not Volume Measurements
Pizza dough is a precision craft. The difference between 525 g and 540 g of bread flour can significantly change the texture and hydration of your dough. A digital kitchen scale is non-negotiable for consistently great results. Volume measurements like cups are too imprecise for high-hydration dough where every gram matters.
2. Do Not Skip the 2-Day Cold Ferment
The 48-hour cold fermentation is not optional -it is the single most important step in this entire recipe. Cold fermentation allows enzymes in the flour to slowly break down starches and proteins, developing a complex, slightly tangy flavor, improved extensibility, and the signature open crumb structure that makes Little Caesars-style pizza dough so unique. A same-day dough simply will not taste the same.
3. Use Bread Flour, Not All-Purpose Flour
Bread flour has a higher protein content (12–14%) than all-purpose flour (10–12%), which creates more gluten development during kneading and fermentation. This extra gluten strength is what allows the high-hydration dough to hold its structure through the long cold ferment and still produce a chewy, airy crust rather than a flat, dense one.
4. Let the Dough Come Fully to Room Temperature Before Shaping
Cold dough straight from the refrigerator is tight, stiff, and resistant to stretching. Trying to press it into the pan will cause it to spring back repeatedly. Allow the portioned dough ball to sit at room temperature for the full 3 hours before attempting to shape it. Fully relaxed, room-temperature dough will spread easily and evenly under gentle finger pressure.
5. Oil the Pan Generously -It Is Not Optional
The oil on the pizza pan does two jobs: it prevents the dough from sticking, and it fry-fries the bottom crust in the oven to produce that characteristic deep golden, slightly crispy underside. A well-oiled pan is essential to achieving the Little Caesars crust texture. Use a neutral high smoke-point oil like canola, vegetable, or light olive oil -not EVOO.
6. Always Bake on the Bottom Rack
Positioning the pizza on the bottom rack of the oven ensures maximum bottom heat contact, which is critical for a well-browned, crispy crust. The top of the pizza will still receive plenty of radiant oven heat to melt the cheese and cook the sauce. If you have a baking stone, place it on the bottom rack and preheat it for at least 30 minutes for the best possible crust results.

7. Shred Your Own Cheese Right Before Assembly
Freshly shredded cheese contains natural moisture and oils that melt smoothly and evenly at high heat. Pre-shredded bagged cheese is coated in anti-caking cellulose, which not only inhibits melting but can also scorch and burn in a 500°F oven before the cheese has fully melted. Taking 3 extra minutes to shred your own mozzarella and muenster makes a noticeable difference in the final melt quality and flavor.
Storage & Reheating Guidance
Baked Pizza: Store leftover slices in an airtight container in the refrigerator for up to 3 days. Reheat in a skillet over medium-low heat with a lid on to restore the crispy bottom and melt the cheese -never microwave, as this makes the crust soggy.
Unbaked Dough Balls: Portioned, oiled dough balls can be refrigerated for up to 4 days or frozen for up to 3 months. Thaw frozen dough balls overnight in the fridge, then bring to room temperature for 3–4 hours before shaping.
Frequently Asked Questions About Little Caesars Pizza Crust
Can I make this pizza dough without a stand mixer?
Yes, absolutely. This dough comes together easily by hand with just a large spoon and some counter kneading. The 5 to 10 minutes of hand kneading is actually sufficient for this recipe because the long cold fermentation does much of the gluten development work for you. A stand mixer with a dough hook will simply make the kneading step faster and less tiring.
What is malt powder and where do I find it?
Malt powder (specifically diastatic malt powder) is a natural enzyme-active powder derived from malted barley. It feeds yeast activity and promotes better browning in the oven by helping the crust caramelize to a deeper golden color. It is available at specialty baking stores, homebrew supply shops, and online. It is optional in this recipe but highly recommended if you want that characteristic dark golden Little Caesars crust color.
Can I cold-ferment the dough for longer than 2 days?
Yes. The dough can be cold-fermented for up to 5 days for an even more complex, slightly tangy flavor profile. Beyond 5 days, the yeast begins to over-ferment and the gluten structure can start to break down, resulting in a sticky, hard-to-handle dough that may produce a flat, dense crust. Two to three days is the sweet spot for the best balance of flavor and workability.
Why is my pizza crust not browning on the bottom?
There are three common culprits: the pan is not oiled enough, the pizza is not being baked on the bottom rack, or the oven has not been fully preheated to 500°F. Make sure you use a generous amount of neutral oil on the pan (not EVOO), position the pan on the lowest rack, and give your oven a full 20–30 minutes to fully preheat before placing the pizza inside.
Can I use all-purpose flour instead of bread flour?
You can, but the results will be noticeably different. All-purpose flour produces a softer, more tender crust with less chew. The high-hydration dough may also be harder to handle with all-purpose flour due to the lower gluten strength. If bread flour is unavailable, a mix of all-purpose flour and vital wheat gluten (1 tsp per cup of flour) can help approximate the higher protein content of bread flour.
What is the difference between Muenster and regular mozzarella in this blend?
Low-moisture mozzarella provides the classic stretchy, gooey pull that everyone associates with pizza cheese. Muenster, especially black muenster from the deli counter, adds a creamy, buttery, slightly tangy flavor layer and a superior melt quality that keeps the cheese from becoming rubbery. Together, the blend creates a cheese layer that is richer and more complex than mozzarella alone -and much closer to what Little Caesars actually uses on their pizzas.
Do I need a pizza stone for this recipe?
No. A pizza stone is optional but helpful. Baking the pizza in an oiled pan directly on the bottom rack of a fully preheated 500°F oven will produce excellent results on its own. If you do have a pizza stone, place it on the bottom rack, preheat it for at least 30 minutes, and set the oiled pizza pan directly on the stone for the crispiest possible bottom crust.
Why does my cheese burn before the crust is done?
This is almost always caused by one of two things: using pre-shredded cheese (which contains cellulose that burns faster) or positioning the pizza too high in the oven. Make sure you are shredding your own cheese, baking on the bottom rack, and using the full mozzarella-muenster blend in the correct ratio. If your oven runs particularly hot, you can also start the pizza covered loosely with foil for the first 8 minutes and then uncover for the final 4–5 minutes.
Little Caesars Pizza Crust Recipe
If you have ever wondered what makes Little Caesars pizza crust so uniquely thick, chewy, and golden on the bottom, the secret is a long, slow cold fermentation process that most homemade pizza recipes skip entirely.
Ingredients
- San Marzano canned tomatoes: 1 can (28 oz)
- Black pepper: 1 tsp
- Sea salt or kosher salt: 1 tsp
- Extra virgin olive oil: 2 tbsp
- Garlic: 4 cloves, chopped
- Fresh basil leaves: 4 large, cut up
- Low-moisture whole milk mozzarella: 2/3 of total cheese (such as Galbani)
- Muenster cheese: 1/3 of total cheese (black muenster from the deli counter)
- Regular neutral oil (for greasing the pan)
- Dried oregano (for finishing)
- 12-inch pizza / 12.5-inch pan: Use an 11.8 oz (312 g) dough ball
- 14-inch pan: Use 16.4 oz (465 g) dough ball
Instructions
Part 1: Make the Pizza Dough (68% Hydration)
Important: The dough must cold-ferment in the refrigerator for 2 full days before baking. Plan accordingly.
Step 1 -Mix the Wet Ingredients
Add 357 g of cool or lukewarm water to a large bowl or pot. Add 6 g of yeast, 12 g of sugar, and 26 g of extra virgin olive oil. Stir gently to combine and allow the yeast to begin dissolving in the water.
Step 2 -Add the Dry Ingredients
Add 525 g of bread flour, 10 g of malt powder (if using), and 12 g of sea salt or kosher salt to the wet mixture. Stir with a large spoon until all the flour is incorporated and the dough begins to come together into a shaggy mass.
Adding malt powder is optional but highly recommended if you want that deep golden-brown crust color that is characteristic of Little Caesars pizza. Diastatic malt powder works best.
Step 3 -Knead the Dough
Turn the dough out onto a clean counter or continue in the bowl. Knead by pressing, folding, and rotating the dough for 5 to 10 minutes until it forms a smooth, cohesive ball. The dough should feel slightly tacky but not sticky. At 68% hydration this is a wetter dough than standard pizza dough -this is what creates that open, airy crumb structure.
Step 4 -First Rise (Room Temperature)
Return the dough ball to the pot or bowl. Cover tightly with a lid or plastic wrap. Let it sit at room temperature for 1 to 2 hours until the dough has doubled in size.
Step 5 -Cold Ferment (2 Days)
Punch the dough down lightly, cover, and place the entire pot in the refrigerator. Cold-ferment for 2 full days. During this time, the yeast works slowly, developing deep flavor, improved gluten structure, and that characteristic chew that sets this crust apart from fast-risen pizza dough.
Step 6 -Portion the Dough
After 2 days, remove the dough from the refrigerator. Using a kitchen scale, portion it into dough balls:
- 312 g (11.8 oz) for a 12-inch pizza
- 465 g (16.4 oz) for a 14-inch pizza
Place each dough ball into a lightly oiled Tupperware container or covered bowl. Seal and refrigerate any dough balls you are not using that day.
Step 7 – Final Room Temperature Rise
Remove the dough balls from the fridge 4 hours before you plan to bake. Allow 3 hours for the dough to come fully to room temperature, then proceed to shaping and the 1-hour pan proof in Step 10.
Part 2: Make the Pizza Sauce
Step 8 -Blend the Sauce
Add the entire can of San Marzano tomatoes, 1 tsp black pepper, 1 tsp salt, 2 tbsp extra virgin olive oil, and 4 chopped garlic cloves into a blender. Pulse several times until the tomatoes and garlic are crushed and the sauce is smooth but not completely liquefied -a slight texture is ideal.
Step 9 -Add Fresh Basil
Transfer the blended sauce to a bowl. Stir in the 4 cut fresh basil leaves. The sauce is ready to use immediately, but for the best flavor, cover and refrigerate overnight. The garlic and basil will bloom and mellow, producing a richer, more cohesive sauce.
Part 3: Assemble & Bake the Pizza
Step 10 -Prep the Pan and Shape the Dough
Lightly coat your pizza pan with a neutral oil (not extra virgin olive oil, as it burns at the high temperatures needed). Using the flat parts of your fingers, press the room-temperature dough ball out in a circular motion until it is slightly larger than the pan. Lay it gently into the oiled pan, pressing it to fill the edges.
Important: Use regular vegetable or canola oil for the pan -not EVOO. Extra virgin olive oil has a lower smoke point and will burn at 500°F, giving the bottom crust a bitter, acrid flavor.
Step 11 -Pan Proof (1 Hour)
Cover the pan loosely with plastic wrap. Allow the shaped dough to rise at room temperature for 1 hour. It should puff noticeably and look pillowy before you dress it.
Step 12 – Dress the Pizza
Spread a medium, even layer of the tomato sauce over the dough, leaving approximately half an inch bare around the perimeter for the crust edge. Top generously and evenly with 2/3 of the shredded low-moisture whole milk mozzarella. Layer the remaining 1/3 muenster cheese on top of the mozzarella. Finish with a light sprinkle of dried oregano.
Cheese Tip: Never use pre-shredded cheese for this recipe. The cellulose coating on bagged shredded cheese prevents proper melting and can cause scorching in a 500°F oven. Shred your own mozzarella and slice or shred your muenster fresh from the block or deli counter.
Step 13 -Bake at 500°F
Preheat your oven to 500°F (260°C). Place the pizza pan on the bottom rack of the oven, or set it directly on a preheated baking stone for the crispiest possible bottom crust. Bake for 12 to 13 minutes until the crust is deep golden brown on the sides and the bottom is visibly browned and caramelized when you lift an edge with a spatula. The cheese should be fully melted, bubbly, and just beginning to spot with golden color.
Step 14 -Rest, Slice & Serve
Remove the pizza from the oven and let it rest in the pan for 2–3 minutes before slicing. This brief rest allows the cheese to set slightly and makes for cleaner cuts. Slice into 8 pieces and serve immediately.
Notes
Baked Pizza: Store leftover slices in an airtight container in the refrigerator for up to 3 days. Reheat in a skillet over medium-low heat with a lid on to restore the crispy bottom and melt the cheese -never microwave, as this makes the crust soggy.
Unbaked Dough Balls: Portioned, oiled dough balls can be refrigerated for up to 4 days or frozen for up to 3 months. Thaw frozen dough balls overnight in the fridge, then bring to room temperature for 3–4 hours before shaping.
Nutrition Information:
Yield:
24Serving Size:
1Amount Per Serving: Calories: 754
We’d love to know how this recipe works out for you! Give it a try and leave a comment below to share your experience, tips, or any tweaks you made. Don’t forget to follow us on Pinterest and YouTube for more tasty recipes and kitchen inspiration. Your support and feedback truly mean everything to us!